How To Test If A Multimeter Is Working?
Key Takeaway
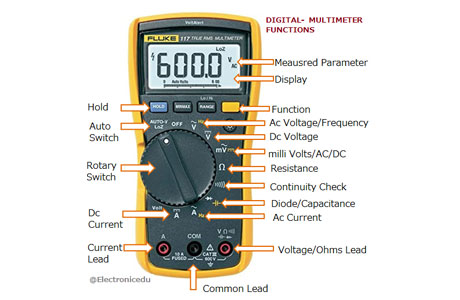
To test if a multimeter is working, follow these steps. Set the dial to the ohms (Ω) setting. Insert the black probe into the COM port and the red probe into the Ω port. Touch the tips of the probes together gently. The reading should be around 0 or less than 0.5 ohms. If it’s higher, the probes may need replacement.
To check the probes individually, insert one probe at a time and test for zero resistance. You can also test the accuracy of the multimeter by measuring a known reference, such as a resistor or a voltage source, and compare the reading to the expected value. If the readings are off, the multimeter may require calibration or repair.
Signs That Indicate a Multimeter May Not Be Functioning Properly
Before you start testing your multimeter, it’s helpful to recognize common signs that it might not be working as expected.
Symptoms of a Faulty Multimeter:
No Display or Flickering Screen: If the display is blank, faint, or flickering, it could indicate a dead battery or internal damage.
Inaccurate Readings: If measurements differ significantly from expected values, the multimeter may need recalibration or repair.
Continuity Mode Issues: A faulty continuity test, where no sound or incorrect readings occur, could point to a problem with the probes or internal circuitry.
Unresponsive Buttons or Dial: Difficulty changing settings may indicate mechanical wear or internal issues.
Blown Fuses: Multimeters with a blown fuse in the current port will not measure current accurately.
If you notice any of these signs, it’s time to test your multimeter thoroughly and address any underlying issues.
Steps to Test Multimeter Continuity Mode
The continuity mode is a quick and easy way to verify that your multimeter is operational. Here’s how to test it:
Set to Continuity Mode: Turn the multimeter’s dial to the continuity setting, usually marked with a soundwave symbol.
Connect the Probes: Insert the black probe into the COM port and the red probe into the voltage/resistance (VΩ) port.
Test the Probes: Touch the metal tips of the probes together. The multimeter should emit a beep, indicating a closed circuit.
Check for Issues: If there’s no beep or if the display shows inconsistent readings, inspect the probes for damage or loose connections.
A working continuity mode ensures the multimeter’s basic functionality and confirms that the probes are in good condition. If the continuity test fails, troubleshoot further by replacing the probes or checking the internal circuitry.
How to Verify Voltage Measurement Accuracy
Accurate voltage measurements are a critical function of any multimeter. Here’s how to verify this feature:
Use a Known Voltage Source: Obtain a reliable voltage source, such as a fresh battery or a standard wall outlet, for testing.
Set the Multimeter to Voltage Mode: Turn the dial to DC voltage (for batteries) or AC voltage (for outlets).
Connect the Probes: Insert the black probe into the COM port and the red probe into the VΩ port.
Measure the Voltage: Place the probes on the positive and negative terminals of the battery or the live and neutral slots of the outlet.
Compare Readings: The multimeter’s reading should match the expected voltage of the source. For example, a fresh AA battery should show around 1.5V.
If the readings are inaccurate, the multimeter may require recalibration or repair. Regularly verifying voltage accuracy ensures your device remains reliable for critical tasks.
Checking the Multimeter’s Fuse and Internal Components
A blown fuse or damaged internal components can render a multimeter unreliable. Here’s how to check and replace these elements:
Inspect the Fuse:
Open the multimeter’s casing using a screwdriver.
Locate the fuse, which is usually near the current port.
Check if the fuse is blown (a dark or broken filament indicates damage).
Replace the Fuse:
Use a fuse of the same type and rating as specified in the multimeter’s manual.
Carefully insert the new fuse and reassemble the device.
Check Internal Components:
Look for signs of damage, such as burnt circuits or swollen capacitors.
If you find issues, consult a professional for repairs.
A functioning fuse and intact components are essential for accurate and safe current measurements. Replacing damaged parts promptly extends the life of your multimeter.
Best Practices for Maintaining a Fully Functional Multimeter
Regular maintenance can prevent many issues and keep your multimeter in top condition. Here are some tips:
1. Store Properly: Keep the multimeter in a protective case, away from moisture, dust, and extreme temperatures.
2. Inspect Probes Regularly: Check probes for wear, cracks, or loose connections. Replace them if needed.
3. Use Correct Settings: Always select the correct range and mode to avoid overloading the multimeter.
4. Replace Batteries Promptly: A low battery can cause erratic readings or damage the device over time.
5. Calibrate Annually: Regular calibration ensures the multimeter stays accurate, especially in professional environments.
By following these best practices, you can minimize downtime and ensure your multimeter remains a reliable tool for years to come.
Conclusion
Testing a multimeter regularly is essential to maintain its reliability and accuracy. From verifying continuity mode to checking voltage measurements and inspecting internal components, these steps help identify and resolve potential issues before they escalate.
For new engineers and seasoned professionals alike, a well-maintained multimeter is a cornerstone of successful electrical work. By prioritizing regular testing and maintenance, you can trust your tool to deliver precise and consistent results every time.